How to create a Smartframe or Smartclient deployment package

Once you have finished modernizing your application you will need to create an installation package and deploy it to your end users.
The first step in the process is creating a deployment package. A deployment package combines Newlook application and custom solution files into an executable and version management files. The installed program can then automatically download any available updates (depending on the update option you have specified in the package).
CREATING A DEPLOYMENT PACKAGE > DEPLOYING TO END USERS > DEPLOYING UPDATES > ADVANCED DEPLOYMENT OPTIONS
Creating a basic deployment package
Ensure that the solution you wish to deploy is currently loaded in Developer and that all files referenced in the solution are present in the solution folder.
Create New Deployment Package entry.
- Open Tools >
 Deployment and click
  New.
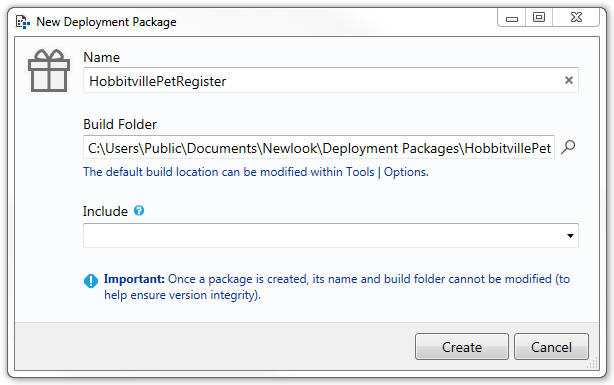
New. - Enter a Name and Build Folder for your package.
- Leave the Include field blank (this field is used to include the contents of another package in the current package, refer to Advanced deployment for more information).
- Click Create.
MORE INFORMATION
A package's Name is essentially it's internal key. It cannot contain any spaces. The Build Folder specifies the location where the deployment package will be created, once built. Each package requires a unique name and build folder, therefore it is recommended that you use the default build folder location. If you wish to change the default build folder for this field, you can configure this in Options.
IMPORTANT:
Once specified, the Name and Build Folder cannot be modified for that package. This is to ensure version integrity for any future package updates.
Specify package properties
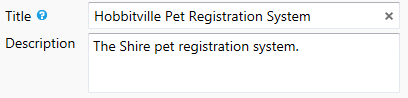
- Enter a Title and Description for your package. These two fields will become the installed application's title and description respectively, in the Windows Add/Remove Programs list. Unlike the package Name, these two fields can be modified at any time.
- If relevant, check the Compact repository option. This will compress any shared repository (.SID) files in your deployment package. This action will not only reduce their size, but also make them read-only.
- If you require an MSI file for end-user installation, check the Create MSI file option. Your deployment package will include a setup.MIS and setup.EXE file. The MSI file generated is suitable for installation via Group Policy by IT Admin and is a machine-wide install. This MSI isn't a general-purpose installer, this means that once you run the MSI, users will get the app installed on their next login.
- Specify the Client Update Location. This will need to be somewhere that your end users can access to download your application - it will also be the location that your deployed application will reference to check for any updates. The Client Update Location can be either a URL or file path. Refer to Client Update Location options for more information.
- Select your package's update Mode. This mode dictates how your installed application package should behave when it detects there is a new update. Note that if you decide to change update modes after you have deployed your application, you will need to deploy a package containing the change of mode to your users, then the new mode will take effect the next time a package update is available.
- Prompt - the end user will be prompted with a dialog whenever an update is available and can elect to update their application or ignore the update. Updating will force a restart of the client.
- Silent - any available update will be downloaded automatically without notification and will be applied the next time the user restarts the client.
- Manual - end users will not be prompted when an update is available, however they can access update information via the menu option Help | Check for Updates and manually update at a time that suits them (this is relevant to environments where bandwidth may be limited for specific periods). Updating will force a restart of the client.
Add shortcuts
The next step is to configure one or more desktop shortcuts for your deployed application.
- Open the shortcut editor by clicking the plus
 button in the shortcuts section.
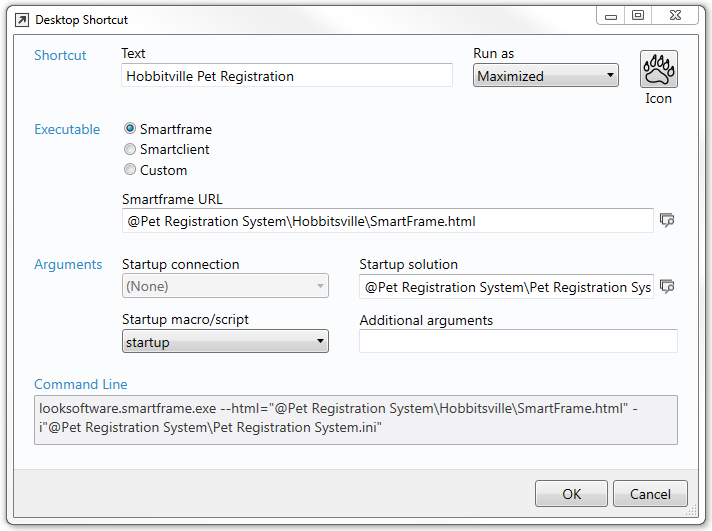
- Enter the display Text for the desktop shortcut. This is the text that will appear below your shortcut (or as a tool tip if you hover over it).
- In the Run as drop down, specify whether you want your deployed application to start as a normal, maximized or minimized window.
- To use a custom graphic for your application's title bar and shortcut, click the Icon button. This opens the Select Icon window. This dialog shows you all the files that are currently included in this deployment package (the checked items). To select a custom icon, the relevant icon file must be checked for inclusion (in other words, a checked item in this window). If it is, then click on the .ico file and click OK. If the file you wish to use is not already checked, you can check and select it in this window. Doing this will add the files to the list of files included in the package in the Files tab. Click Use Default Icon to use the Newlook icon in your shortcut.
- Select the executable that this shortcut will start. Smartframe will deploy your solution inside the Smartframe specified in Smartframe URL . Smartclient will deploy your solution as a standalone Windows application and Custom allows you to deploy a custom executable (you will need to select the executable that you wish to run from the list of deployment files).
- The final step is configuring either the Startup connection or Startup macro and any additional command line arguments that you wish to include. There is also the option here to change the Startup solution for the shortcut, however most of the time this will be the default solution, which will be the solution loaded in Newlook Developer when the package was created.
NOTE
If you do not specify a startup connection or startup macro in your shortcut, then your solution's startup macro/script will run when Smartframe starts (if one exists).
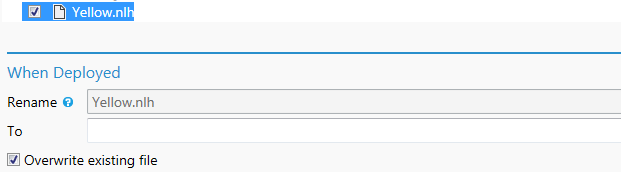
Specify files to be deployed
- De-select any files that are not used in your solution.
When you create a new deployment package, any files in the current solution folder (typically this is a sub-folder which contains your sid, ini and all your solution files) will be automatically included in this package. In addition, the user.sid file and C:\ProgramData\Newlook 11.1\Images folder is also selected, as many solutions reference images in this folder. As a general rule, it is recommended that any files you wish to deploy should be inside the solution folder, however it is possible to select any file under the data path (C:\ProgramData\Newlook 11.1) for deployment. You may also wish to add any applicable display schemes (.nlg) and keyboard schemes (.nlk) to your file selection.
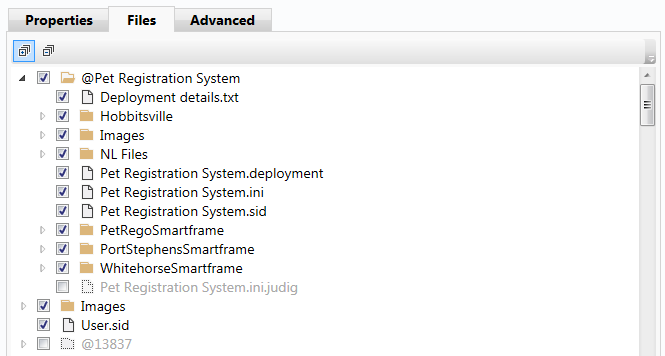
Once a file is selected for inclusion, you have the option to Rename the file once it is deployed to an alternate name. The topic on Advanced deployment options covers this in more detail.
It is also possible to choose whether the deployed file can be overwritten once deployed, via the Overwrite existing file check box. Most files are overwritten by default (with the exception of the User.sid file). Any files which contain end-user settings should not be marked as 'Overwrite' as they will be replaced on every package update.
the Advanced tab
It is possible to sign your deployment package by adding a security certificate and password in the Advanced tab. This tab also contains Advanced options that may be useful for developers deploying multiple packages.
Build the package
- Once you have configured your package properties and selected all the files you wish to deploy, create your package by hitting the
 Build button. This process may take several minutes as all of your solution and Newlook executable files are compressed into an installation package. Once complete, the package files will be available in the location specified in the Build Folder field.
- Manually upload all the files in this folder to your Client Update Location folder (unless the client update location is a local folder, in which case the package folder will be automatically copied to this location).
IMPORTANT:
It is important that you copy the built package files to the exact location specified in the package's Client Update Location field. Once deployed, the application will check the Client Update Location for a newer version of the package each time it starts. Therefore it is important that the update location is consistent.
Once your installation package is ready, the current version of the package will be reflected in the Packages collection window. Once your application is deployed to your end users, you can check the version they are running (in either Smartframe or Smartclient) via the About box.

Next step: Deploying to end users
See Also
Deploying to end users | Deploying updates | Signing your deployment | Deployment Reference
© 2004-2021 looksoftware. All rights reserved.