Deployment - Deploying updates

Once you have built your initial deployment package and deployed it to end users, you will want to ensure that any subsequent changes to you solution can be made available to your end users. This can include changes to your custom solutions files but it can also include new versions of Newlook Smartclient or modifications to your Smartframe template.
CREATING A DEPLOYMENT PACKAGE > DEPLOYING TO END USERS > DEPLOYING UPDATES > ADVANCED DEPLOYMENT OPTIONS
Getting updates to your end users
Once you have made modifications to your solution (this may be minor changes to overrides, the inclusion of additional files or the roll-out of a new version of Newlook) you will need to re-build your package and upload those files to the Client Update Location used by your deployed application.
- Open Tools >
 Deployment and select the deployment package that you want to update.

- Make any desired changes to the package's properties (if required) and click the
 Build button to rebuild the package.
IMPORTANT:
If you have added new files to your solution, you will need to ensure that they are selected in the Files tab before rebuilding the package.
The Version and Last Built properties of the package will be updated at this point to reflect the latest built state.

- Once complete, the package files will be available in the location specified in the Build Folder field.
- Manually upload all the files in the Build Folder to your Client Update Location folder and replace any existing files. At this point the application updates are available for download.
IMPORTANT:
Avoid changing the Client Update Location once you have deployed your software as previously deployed clients will reference this location to check for updates.
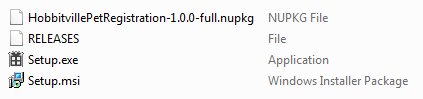
- <package name>-1.0.0-full.nupkg,
- RELEASES,
- Setup.exe and
- Setup.msi (if you have selected the option to build an msi file).
What's going on behind the scenes?
When you first build a deployment package, you will notice that the process creates a series of installation files:
When you build the package a second time, the process creates two additional files: <package name>-1.0.1-full.nupkg and <package name>-1.0.1-delta.nupkg
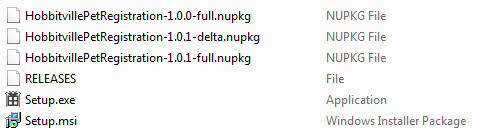
Once deployed, the Newlook client will check it's internal version against the version history saved in the RELEASES file. If the current version is not up to date, it will download changes contained in any delta file with a version greater than the deployed client's version.
In the example above, if the deployed client is running version 1.0.0, then only the HobbitvillePetRegistration-1.0.1-delta.nupkg will be downloaded. For users performing a full install, running Setup.exe will install the most recent full version of the software - in this example HobbitvillePetRegistration-1.0.1-full.nupkg.
Saving space in your client update folder
Each time you update and build your deployment package, two files are generated: <package name>-<version>-full.nupkg and <package name>-<version>-delta.nupkg. If you are constantly copying both files to your client update folder, it will grow considerably in size over time. In order to keep your file storage at a minimum, but still provide an efficient update experience for users, we recommend the following approach:
- IMPORTANT! Always back up all files generated from the deployment tool (.nupkg files, RELEASES file, setup.exe). Preferably on a server that is separate to your production machine. In case of an installation failure, you can always restore from the back ups.
- In your client update folder, keep all the 'delta.nupkg' files for each version you deploy (there must not be any gaps in the delta files, otherwise the deployed client will download the next full version) and the latest 'full.nupkg' file.
- The 'RELEASES' file in your client update location should match the packages listed in the folder. Update errors can occur when the contents of this file are not consistent with the contents of the client update folder.
See Also
Creating a deployment package | Deploying to end users | Signing your deployment | Deployment Reference
© 2004-2021 looksoftware. All rights reserved.