Advanced Deployment

The advanced deployment options are designed for administrators who require one-to-many deployment, where a core IBM i application is distributed to multiple customer sites. In this scenario, the Newlook solution files (.sid and .ini) are usually the same for all deployments, with the exception of a small number of elements, such as customer-specific graphics and connection settings, which must be customized for individual deployments.
CREATING A DEPLOYMENT PACKAGE > DEPLOYING TO END USERS > DEPLOYING UPDATES > ADVANCED DEPLOYMENT OPTIONS
There are three features within the deployment tool that can simplify the process of one-to-many deployments:
- Include - allows you to include the contents of an existing package in the current package.
- File rename - allows you to rename a nominated file when the package is installed.
- Connection overwrite - allows you to replace the current solution's connection details with connection properties that are specific to the environment you are deploying to.
Including the contents of one package in another
If you are distributing your application to different environments, but the bulk of your solution is identical for all environments, you may wish to make use of the Include feature in the deployment tool. This feature allows you to add all of the files and shortcuts in one package to a different package. This means you can set up a generic base package, which contains all the files that are common to your deployments, and then include that package in a series of specialized packages. Any changes to files in the base package would be instantly reflected in any specialized packages including it.
In each specialized package you would then add the files that are unique to the environment you are deploying to. These could include custom graphics or reference files.
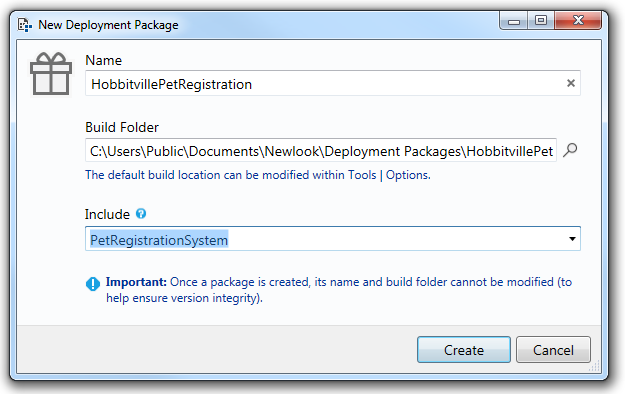
To add the contents of an existing base package to a new package, select the relevant option from the Include drop down in the New Deployment Package dialog.
When you are creating a new package and you "include" a base package, then the new package's default Title, Description and Shortcuts (if there are any) will be derived from the base package - they can be changed once the package is created if you prefer. For existing packages, you can access this feature from the Advanced tab.
A base package's files will automatically appear in the specialized package's Files list- they will appear as grayed-out entries and cannot be edited.
Note:
Once a specialized package has been created, any changes you make to the base package's title, description or shortcuts will not be reflected in the specialized package. However, any changes you make to files in the base package, will be reflected in any packages including the base package.
File rename on install
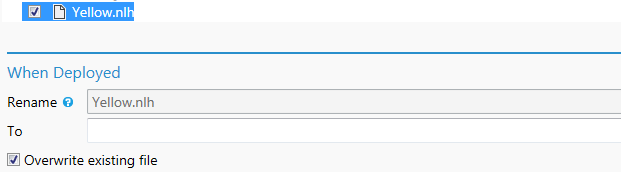
Another useful feature is the file Rename property. This property allows you deploy a file with an alternate name, which is useful if you wish to substitute files in your deployment package for specific customers.
Once a file has been selected for deployment, you have the option to Rename it, on deployment, to an alternate name.
EXAMPLE
Let's imagine that your solution contains a sign on screen with a company logo in the corner of the form. You have multiple customers that you want to deploy the same solution to, however the image that you want to display on the sign on screen is different for each customer. The image files are prefixed with the customer name: CustomerALogo.svg, CustomerBLogo.svg and so on. The sign on form in your solution references a placeholder image, Logo.svg, in the location where you want to display the company logo. When you create a deployment package for Customer A, you would de-select Logo.svg from the Files list, and instead include CustomerALogo.svg in the list of files to be deployed, then specify to rename this file to Logo.svg when deployed.
Connection overwrite
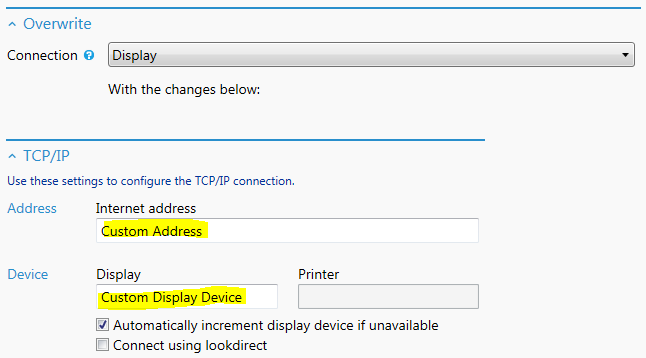
When distributing a solution to multiple customers, the host connection details will often be different for each customer's deployment package. The Connection Overwrite feature in the Advanced tab, allows you to easily replace the properties of any connection in your current solution with customer-specific properties in the built package.
To do this, you first need to select an existing connection from the Connection drop down in the Advanced tab, then update the connection settings with values that are relevant to the current deployment package.
See Also
© 2004-2021 looksoftware. All rights reserved.