Newlook Smartframe templates
Version Support
This information relates to Smartframe templates included in Newlook 11 and above.
The default Newlook Developer installation includes a Templates folder under C:\ProgramData\Newlook 11.1. This folder contains pre-built HTML 5 Smartframe templates that can be used in your solution.
Be aware:
The content in the Templates folder may be updated each time you install a new version of Newlook. If you want to include one of these templates in your solution, you will need to copy the relevant template folder into your solution folder to avoid your changes being overwritten when you update Newlook (refer to the section Assigning a template to your solution below). We also encourage developers to use a source control program, such as SVN or Git, to manage changes to their Smartframe templates.
Fixed Size template
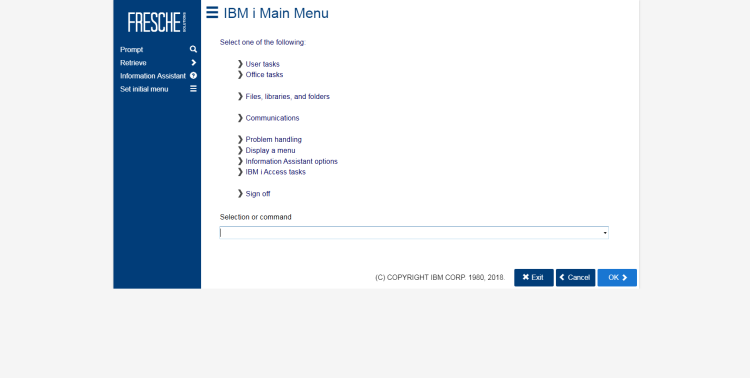
The Fixed Size template displays application screens in an uncluttered, modern and easy-to-use UI. It utilizes the maximum available space for the client runtime window, given the available vertical area and the layout of screen components. Screen title and function keys are moved out of the runtime window into separate panels, while the Exit, Cancel and OK function keys are located in the bottom right corner, providing consistent UI elements for users who interact with them on a daily basis. The template is displayed at a fixed size, regardless of the container window's size. This is useful if you have a solution that has been designed at a specific size, and you do not want it to scale.
Adaptive template
The Adaptive template uses the same visual styling as the Fixed Size template, but scales according to the user's window size. This template is useful if your users typically view your screens in full screen mode.
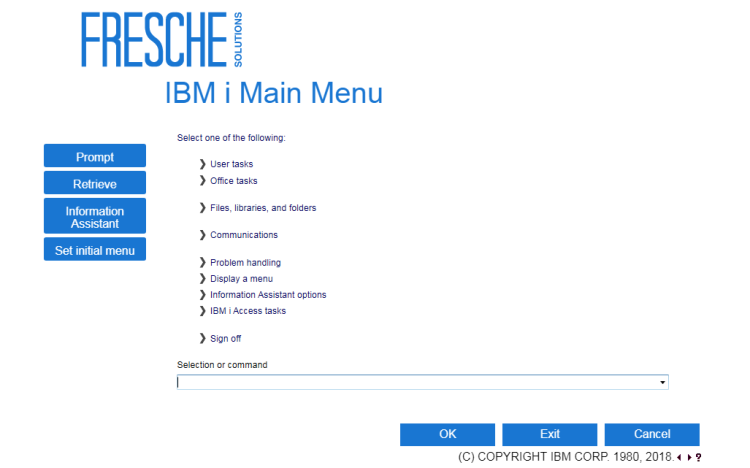
Basic template
The basic template also provides the maximum available space for the client runtime window. It is a fixed-size template with a company banner that extends across the full width of the screen. This is useful if you want to get your company branding front and center. Function keys are moved out of the runtime window into individual buttons, instead of clickable links in a navigation panel.
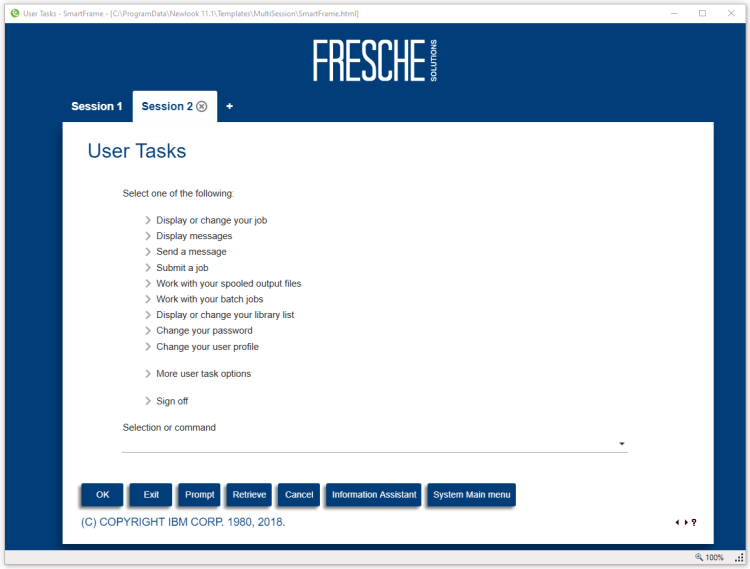
Multi-session template
Introduced in Version 11.1.
This template has been designed to make use of the multi-session functionality introduced in version 11.1. It provides users with the ability to create new sessions tabs, and then seamlessly switch between those sessions within Smartframe. For more information about multi-session support in Newlook, refer to the Multi-sessions topic.
The Newlook 11 templates have been designed to be simple to configure, however they also provide plenty of flexibility should you need it. For many users, customizing a few basic elements in the template will be sufficient to provide them with something that meets their requirements. However, if you require a highly custom template, the flexibility is there to do so.
Key differences to note between Newlook 11 templates and older templates
In previous versions of Newlook (version 10 and below), the top-level Smartframe container was an MS Internet Explorer browser window, containing a HTML page. This HTML page instantiated a Newlook Active X control.
From Newlook 11.0 onwards, the top-level Smartframe container is no longer an IE browser window. It is now a stand-alone executable, looksoftware.SmartFrame.exe, which contains it's own Chromium-based browser, used to render and execute the specified Smartframe template's HTML, CSS and Javascript files. The Newlook Active X control has been replaced with the Smartframe Newlook Control, which interacts with the HTML page, based on the properties specified in the newlook object tag, within the parent HTML. There is no need to have any browser installed on your end user machines, Smartframe will run on a clean Windows environment.
BE AWARE:
It is no longer possible to start Smartframe by opening a HTML or HTA file containing the Newlook object. To start Smartframe you will now need to configure the Smartframe URL for your solution (in General Settings), then run the executable looksoftware.SmartFrame.exe, pointing to your solution. For end users, shortcuts can be configured during the deployment process, however for administrators and developers, you can start Smartframe from the executable shortcut or via the Smartframe preview button in Developer (which will automatically load the current solution).
Configuring Smartframe shortcuts
Smartframe is typically distributed to end users via the standard Newlook deployment process. If the Smartframe URL field in General Settings in your solution points to a Smartframe template, then any desktop shortcuts created in the deployment package will be automatically configured to point to the solution's template.
If you are running Newlook Developer and you want to view your solution in a different Smartframe template, you can do this one of two ways:
- Specify the relevant Smartframe template for the solution in the Smartframe URL field in General Settings, then click the Smartframe preview button (
 ) to open Smartframe with the current solution and template.
 - Navigate to C:\Program Files (x86)\Newlook 11.1 and create a
looksoftware.SmartFrame.exedesktop shortcut with the following command line arguments:
- -i command line argument pointing to your solution
- --html command line argument pointing to your Smartframe template HTML (optional). If not specified, the shortcut will load the template defined in the Smartframe URL setting in your solution, however you can use this command line argument to override the solution setting and view your solution with a different template.
- With your current solution loaded in Developer, open Settings | General Settings.
- Change the SmartframeURL field to point to one of the sample templates (i.e.
C:\ProgramData\Newlook 11.1\Fixed Size\Smartframe.html). - Click the Smartframe preview button to open the current solution in your specified template.
- Switch the Smartframe URL field to the other template and click the preview button again to compare templates.
Tip:
The above method should only be used for previewing the available installed templates. If you are going to use a template with your solution, you will need to copy the template folder into your solution (see the 'Assigning a template to your solution' section below).
- If you have decided you would like to use one of the new templates in your existing solution, manually copy the desired template folder (and all its files) from
C:\ProgramData\Newlook 11.1\Templatesinto your solution folder. - Modify the Smartframe URL in General Settings to point to the template's HTML file in the folder you have just copied into your solution.
TIP:
If you are creating a new solution from scratch, the Smartframe Template field in the New Solution dialog allows you to select a template to use in your solution. When the solution is created, the relevant template files will be automatically copied into your new solution directory, and the Smartframe URL field in settings will reference this template. Once you have created a solution however, you will need to use the steps above to change templates.
You can create your own Smartframe template and make it available as one of the template options in the New Solution dialog. To do this, you will need to have, at the very least, a template consisting of a parent folder (ideally with a descriptive name) and an html file (containing the Newlook object). Copying the parent folder (and its files) into the C:\ProgramData\Newlook 11.1\Templates folder will add this template to the list of available templates in the New Solution dialog.
BE AWARE:
When you select a Smartframe template in the new solution dialog, the selected template folder (and its files) are copied into your solution folder. If you make subsequent changes to the template files, you will need to update the equivalent files in your solution folder as well.
The basic structure of the v11 Smartframe templates is fairly straight forward. Each template contains a HTML file, some JavaScript files, a stylesheet folder containing a LESS file and all the relevant images and fonts used in the template.
While the general layout of components in both templates is consistent with past versions, it is now far easier to customize a template. The Newlook control (runtime window) is still front and center as the main visual component and it is surrounded by various HTML components which interact with it. All templates have been designed to conform with UI/UX best practices.
The smartframe.html should not need changing if you are satisfied with the basic screen layout. If you wish to change layout however, the semantic HTML makes it easy to identify the different sections in the main body. These include:
- container - an overall container for all the elements on the page
- screen header
- screen navigation
- function keys
- screen title
- runtime container - the old Newlook class id object still exists in the template to provide compatibility with old templates - under the covers we look for this class id and replace it with the Newlook object
- quick access function keys - these are keys that the user interacts with regularly, they default to OK, Exit and Cancel
- panel navigation
- screen status - this is broken down further into an error message, next, previous and message help
- screen footer section - this is an area in which you can display a footer graphic or text at the bottom of the page if desired
The css folder contains a styles.less file. Less files use the same syntax as CSS (and compile to CSS) however they support some additional features that aren't possible in standard CSS files. One of these is the use of variables. The introduction of variables makes it possible to specify a value in one place, and reuse it many times within your stylesheet. You can specify @variable to be any value. In the top section of the styles.less file, 5 basic color values have been assigned to the variables @PrimaryColor, @SecondaryColor, @HighlightColor, @HTMLBackgroundColor and @DarkPrimaryColor. The colors can be specified as HSL, RGB, RGBA or HEX values, whichever you prefer.
// Global colors - set these values to your company branding colors.
@PrimaryColor: #FFFFFF;
@SecondaryColor: #1976D2 ;
@HighlightColor: #2196F3 ;
@HTMLBackground: #F5F5F5 ;
@darkPrimaryColor: hsl(210, 98%, 24%);
After setting these variables, you can reference the variable in your stylesheet, instead of having to specify the color again. The following example uses the variables @TitleBackColor and @TitleColor to define the color and background-color attribute of the ScreenTitle selector:
#ScreenTitle
{
height: 50px;
display: flex;
align-items: flex-end;
grid-area: title;
color: @TitleColor ;
background-color: @TitleBackColor;
padding-left: 20px;
font-size: 32px;
padding-top: 0px;
}
All installed templates contain a set of variables that correspond to each of the basic screen components. This provides you with more granularity, should you need it.
A variable has also been defined to store the @HeaderImage - the graphic that appears in the top left corner of the screen. You would typically use this to reference your company or application logo (PNG, SVG, JPEG etc..).
There are many other modifications you can make to the templates. How much you decide to change will depend on your experience with HTML, CSS and JavaScript, and also the look and feel you are trying to achieve.
Refer to the main Smartframe topic for an explanation of the different Smartframe components and how they fit together.
See Also
Smartframe Newlook Control API
© 2004-2021 looksoftware. All rights reserved.