Transactions
HOW DO TRANSACTIONS WORK | RECORDING | INPUTS | OUTPUTS | EXCEPTION SCREENS | DELETING | PROPERTIES
![]()
The Transaction Recorder captures each screen that you navigate to and any changes made to those screens (including keystrokes used to traverse them). This information is stored as a transaction. Saved transactions can be called and executed using the PlayTransaction method in a script or macro.
Custom inputs can be specified for a transaction, allowing you to record a transaction with one set of inputs, then modify it to execute with a different set of inputs. Transaction inputs could include things like data on the current screen.
Each transaction you save is added to the current repository's Transactions Collection. Newlook uses this collection to build a virtual model of your application. Each transaction provides information to the model about the relationship of screens in your application, and more than one transaction in the collection may be referenced when transaction playback commences.
Transactions are generally used for the following purposes:
- Streamlining end-user data entry and navigation - Transactions can be used to execute keystrokes sequences entered frequently by users. For example, if your users perform a task that involves navigating through many screens, you could create a transaction which performs all of the navigation, from any location in your application. Transactions can also take input, return output or simply send keystrokes to the host. They can be used to enter data, obtain values, or just navigate from one screen to another. Transactions offer many advantages over the traditional navigation approach, which involves issuing SendKeys via a macro or script, as they allow for greater flexibility and can cater for different navigational sequences. The real power of transactions are their ability to use all transactions in the transaction collection to navigate around an application.
- Web service creation - The transaction recorder is a quick and easy way of capturing core business functions for web services. For example, the recorder could be used to create a transaction which provides external users with the ability to input their customer number and return any outstanding balance. In this scenario, the transaction recorder would be used to capture the various keystrokes necessary to log on, navigate to the relevant part of the system, input the customer number and return the outstanding balance. Once recorded, the transaction would be assigned a web service name, and this web service could then be published using Newlook Server.
TIP
To publish web-services you will need the Newlook Server web services add-on.
Recording
When you record a transaction, each screen you visit creates a new step in your transaction. Any fields you interact with, keystrokes you issue or fields you designate as OutputFields on the screen, will be stored in this step under the expandable item 'Path1'.
If the screen you are recording has an existing host form override applying to it, the name of the override will be stored in the step (in the Form property). When the transaction executes, the step's form override will be used to identify whether the current screen is the same as the transaction step. If a screen has both a generic and specific override applying to it, the specific override will be stored in the transaction step. If there is no existing override applying to the screen, the recorder will automatically create one (the name of any auto generated override will have the suffix 'Auto Saved').
![]()
IMPORTANT:
When automatically creating host form overrides, the transaction recorder will attempt to determine the most suitable screen ID for the current screen. However this may not always be an ID which is unique to the screen. For this reason it is important to review any automatically generated overrides, to ensure that they have a screen ID which will sufficiently identify the screen. This also helps the recorder to build an accurate model of your application. A good understanding of screen identification, overrides and the way that they are applied is crucial before recording any transactions.
After recording, a transaction can be modified to identify certain fields as requiring input or returning output. It is also possible to assign scripts or macros to the OnReceive and OnSent events of any step in your transaction, and to the OnStart, OnFinish or OnAbort events of the transaction itself. These events will only be triggered during transaction execution.
Playback
Once saved, a transaction becomes part of your repository's Transactions Collection and can be referenced via its name and re-played using the PlayTransaction method. You can also test your transaction manually by playing or stepping through it in the transaction recorder.
Newlook has two modes of transaction playback - 'execution mode' and 'navigation mode'. Newlook switches seamlessly between these modes in the following manner when necessary.
When a transaction commences, playback defaults to execution mode.
- The recognition engine compares the host form override applying to the current screen (if there is one) with the form defined in the first step of the transaction.
- If they are the same, then actions defined in the step's path will be executed on the current screen and the values of any defined output fields retrieved. After this, any aid keys specified in the path will be sent to the host and execution will progress to the next step in the transaction.
- This process continues until a screen is received from the host that is not the same as screen defined in the current step. At this point the step will be skipped and execution will move to the next step if, and only if, the following two conditions are met:
- the skipped step does not contain any fields defined as InputFields or OutputFields,
- the skipped step's NextStep property is set to a valid name (i.e. it is not empty or invalid).
- Playback will continue to skip steps in the transaction, provided the above conditions are met, until a step is found which matches the current screen. At that point, execution will continue sequentially. This behavior is useful when you have informational screens, like the program messages screen, appearing occasionally between steps of your transaction - as long as your recording includes the intermittent screens, playback will not be affected if the screen does not appear.
- If the current screen does not match any of the standard transaction steps when playback commences, it will be compared to any steps in the transaction that have been defined as exception steps, and any matching exception step will be executed.
- If there are no standard or exception steps in the transaction that match the current screen, playback will switch to 'navigational mode' and attempt to navigate to the first screen of the transaction.
- If, after switching to 'navigational mode', a match still cannot be found for the current screen the transaction will abort and a runtime error will be generated.
Navigational Mode
Transactions do not work in isolation. Once recorded, a transaction becomes part of your repository's Transactions Collection and also part of the virtual application model.
In navigational mode, segments of other transactions in your collection may be used to navigate to the first screen defined in the called transaction, without the need to reference those transactions directly. Once the recorder has navigated to the first data entry capable screen defined in the transaction, it will switch to 'execution mode' and sequentially execute each step in the transaction, skipping steps if relevant, until the transaction is complete.
TIP!
If you wish to make the most of the transaction recorder's navigational mode, it may be worth recording a transaction which navigates to all of the screens in your application that are used by other transactions. Provided the screens in your recording have overrides with unique screen IDs, this will produce a powerful virtual model of your application. Note that any transactions containing InputFields or OutputFields will not be used in navigational mode.
TIP:
Before commencing recording, ensure that each screen that is to be captured in your transaction has an existing, unique override (refer to the section in Help Using Identify to create overrides for more help on defining unique screen IDs). You will also need to create overrides for any non-standard screens that may be received from the host during playback.
Follow these steps to record a basic navigational transaction:
- Connect to your host application using the runtime client and navigate to the first screen in the transaction sequence (if your recording sequence includes connecting to the host then you can start recording before connecting).
- From the runtime client menu, select Tools | Transaction Recorder (
 ).
). - From the transaction recorder menu, select Transaction | New.
- Click on the record button
(
 ) to begin recording. Navigate through all screens, and enter the required keystrokes to complete the task that you wish to
capture. The transaction recorder will create a new transaction step for
each screen that you navigate to, and any field that you enter
data into will be recorded with a unique name and it's host screen row and column location.
) to begin recording. Navigate through all screens, and enter the required keystrokes to complete the task that you wish to
capture. The transaction recorder will create a new transaction step for
each screen that you navigate to, and any field that you enter
data into will be recorded with a unique name and it's host screen row and column location. - When you have recorded all the necessary screens, click the Stop button (
 ).
). - From the Transaction Recorder menu, select Transaction | Save. Enter an appropriate Name and Description for your transaction and click OK.
- To test your transaction, navigate to the screen
defined in the first step of your transaction and click Play (
 ), to replay your entire transaction, or Play Step (
 ), to step through your transaction.
If you are satisfied that your transaction does what you want it to do, you can now call it at anytime from a script using the PlayTransaction Method.
This transaction does not take any inputs or return any output, it is purely navigational.
To create more sophisticated transactions which pass input parameters and return output for use in web services or live data entry, see the sections How to add input parameters to a transaction and How to return output from a transaction below. To accommodate for any exceptional screens which may be received during playback refer to Transaction Exceptions.
Transaction Recorder Tips:
- When navigating screens in the recording phase you can either type values in with your keyboard or use the mouse for entry.
- It is strongly recommended that specific overrides are created for each screen in a transaction prior to recording. This is particularly important where similar screens exist, to prevent the transaction recorder incorrectly identifying screens.
- It is crucial that all screens that could possibly appear in a transaction are recorded or catered for using error processing. This includes, screens like the 'Display Program Messages' screen which may appear if two or more sessions are connected simultaneously. If the transaction recorder receives an unexpected screen during playback, and this screen it is not catered for, then the transaction will abort. Screens that may occur occasionally, or as a result of an error in data entry, can be included as part of the transaction sequence or catered for specifically as an Exception Screen.
- It is possible to pause a recording at any stage by clicking the Stop button ().
You may wish to do this to check or change the name assigned
to transaction steps or fields that have been automatically defined in the transaction.
It is important to ensure that fields defined within the steps of your transaction
have logical names. The recorder will automatically assign a name to all
fields based on their prompt text, however
this is not always the best name for the field.
Transactions can accept two types of input:
- Literals - hard-coded values that you have defined in the transaction itself (either during the recording process or manually after recording is finished). These values will be sent to the host as part of transaction playback.
- InputFields - custom values that are passed to the transaction in the PlayTransaction method call.
By default, when you enter a value into a field during the recording phase, that field will be defined as a Literal field, and any keystroke you enter into the field will be stored in its Value property. Once a field has been defined as a literal input to the transaction, it can be changed to an InputField (you can do this during the recording phase by pausing the recording, or after you have finished recording by editing the saved transaction).
Defining a field as an input parameter of a transaction
- Expand the transaction step which contains the field you wish to define as an input parameter. Select the field and review the Name assigned to the field (in the properties section at the bottom of the window). Replace the default name if the assigned one is not appropriate.
![]()
TIP:
Each field that you modify during the recording phase will be saved with a unique name and appear within the Path for that screen. The field's name will be derived from any adjacent field prompt. A field's name should be reviewed and updated if it does not adequately describe the field, as it will be used to reference the input parameter.
- Change the Type property to InputField - this will define the field as an input to the transaction.
![]()
- Save the transaction.
It is now possible to pass inputs to the transaction in your PlayTransaction method call. Inputs can be supplied in one of two ways:
- Comma separated strings can be supplied for every 'InputField' defined within the transaction. When specified in this way, the arguments must be provided in the same order that they are defined within the transaction. This method is only recommended where you have a small number of inputs to the transaction and the order of screens is unlikely to change.
- As a series of key/value pairs, where 'key' is the name of the InputField defined in the transaction and 'value' is the value being supplied. With this method, the order that the arguments are specified is irrelevant.
The PlayTransaction method calls might look something like this:
JSCRIPT
Supplying arguments to the PlayTransaction method using comma separated values:
var param1 = app.GetValue("CustomerNumber");
var param2 = app.GetValue("CustomerEmail");
var result = App.PlayTransaction ("EditEmail",Paramtopass1,Paramtopass2);
var returnArray = result.toArray();
Supplying arguments to the PlayTransaction method using comma separated key/val pairs:
var memberID = App.GetValue("MemberID");
var newEmail = App.GetValue("Email");
var result = Sessions.Helper.App.PlayTransaction("GetCustomerName", "CustomerNumber=" + memberID, "CustomerEmail=" + newEmail);
var resultArray = result.toArray();
Worth noting:
If transaction inputs are passed in as string values, then any outputs to the transactions will also be string values. If transaction inputs are passed in as key/value pairs, then any transaction outputs will also be key/value pairs.
When the transaction is re-played
via the Play or Play Step buttons on the transaction recorder interface () you will be presented with a dialog when the transaction starts where you can enter the transaction input values manually.
![]()
If the field's Value property is specified in the transaction, then that value will appear as the default value in the dialog (it's worth noting that a step's Value property is ignored in PlayTransaction method calls when the field is defined as an InputField or OutputField).
TIP:
It is possible to view a transaction's defined inputs in Inspector via the following collection App.Repository.Transactions.<transactionName>.Inputs.
A transaction does not return outputs unless you explicitly define them. You can do this during the recording phase (or manually to a saved transaction) by adding specific fields to a transaction step and identifying them as output fields.
Defining a field as a transaction output
- Navigate to the screen which contains the field that you wish to define as an output for the transaction.
- Ensure that the relevant transaction is open and that the step that correctly identifies the current screen is selected in the transaction Recorder interface (you can specify output fields during the recording phase by pausing the recording on the screen where you want to define output fields, then recommencing recording when you have finished).
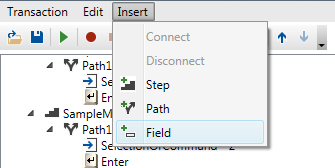
- From the
recorder menu, select Insert |
 Field.
You will notice that the standard mouse pointer has changed to an insert
pointer.
Field.
You will notice that the standard mouse pointer has changed to an insert
pointer.
- Click the
field on the current screen that you wish to define as an output field. This field
will be automatically added to the path for this screen. You can move
this field up or down the list of fields in the Path by selecting
 Move Up or
  Move
Down.
Move
Down.
- Review the Name assigned to the field in the Properties window. Any output will be referenced using its name, therefore it is important that a logical name is assigned to the field. The field will display in error if a name cannot be determined automatically for it.
- Check that the
Type property of the field is set to
'OutputField' (
 ).
). - Save your changes.
- Test your recording by playing or stepping through it. Any output fields will be returned at the bottom of the status window.
![]()
TIP
The name of any outputs defined in the transaction will be added to the Outputs collection of the transaction object.
Any successful PlayTransaction method call will now return the outputs defined in your transaction. It is worth noting that the PlayTransaction method returns a VB Array, so you will need to convert the returned values from a VB to JScript array using the toArray() method if you are calling this method in a JScript script.
WORTH NOTING:
If your transaction has inputs, and they are passed in as string values, then any outputs to the transactions will also be string values. If transaction inputs are passed in as key/value pairs, then any transaction outputs will also be key/value pairs. If no inputs are defined for the transaction then transaction outputs will be returned as string values.
For more information about playing transactions and returning output from transactions via scripts refer to the PlayTransaction method topic.
Transactions are executed sequentially, but there may be times when a screen is received from the host that is not part of the normal transaction sequence.
Screens of this nature fall into three categories:
1. Occasional screens - screens that are occasionally received as part of the normal transaction sequence. They occur at a known place in the transaction sequence and require the same input, every time, to progress to the next step in the transaction sequence.
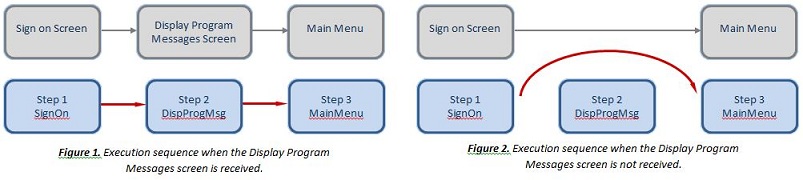
One good example of an occasional screen is the 'Display Program Messages Screen', which appears between the OS i SignOn screen and OS i Main Menu screen if two or more sessions are connected simultaneously. To progress past this screen, the ENTER key is sent to the host.
Where possible, occasional screens should be included in your recording as part of the standard transaction sequence. Upon playback, the this step will be skipped if the screen is not received and execution will move to the next step in the transaction sequence.
Keep in mind:
If a screen has fields defined as OutputFields or InputFields, then transaction execution will not skip over it.
2. Exception screens - these are screens that either occur in a random location and/or require input from the user before processing can continue. Examples of exception screens include the OS i system back-up screen (where the timing of the receipt of the screen is unknown) or a data entry error screen (where the screen requires some input from the user prior to proceeding). These steps cannot be included within a standard transaction sequence as it is not known when they will occur and what the next screen received will be.
It is possible to cater for these screens through the use of exception steps. Exception steps are isolated transaction steps. They contain all the same properties as normal transaction steps. What you do in an exception step will depend on the screen itself:
- If the exception screen is one which occurs intermittently and only requires an aid key to be sent back to the host in order to continue working – then you would set an appropriate AidKey property in the exception path and set the NextStep property to a step which identifies the screen which will be received from the host (if known).
- If the screen occurs as a result of user error, for instance an invalid customer ID entered, then you might want to return an error message to the user via the OnReceive event of the exception screen or you may wish to define a field on this screen, an error message for example, as one of the outputs of the transaction.
3. Unknown screens - the two categories above deal with screens that we know about but how do we deal with screens that we do not know about or have failed to include in our transaction? When an unknown screen is received from the host during transaction playback (i.e. the screen does not appear in any of the transactions in the current repository's collection) the transaction will abort. It is possible to return some meaningful information back to user in this event. Either via the transaction's OnAbort property or through the use of error trapping within the script that initiated the transaction playback.
Creating an exception step
- Open the relevant transaction in the transaction recorder window.
- Connect to your host using the runtime client and manually navigate to the screen which you want to add as an exception step.
- Click on the record button
() to capture the screen - the step which is created will be in error as it is not referenced by any preceding step in the transaction.
- Click Stop
() to pause the recording.
- Click on the step which has just been created.
- In the Properties tab, set ExceptionStep to 'True'.
- (Optional) Specify any macros or scripts that you wish to run on the OnReceive or OnSend event of this screen. This might include a script which returns a message box to the user to alert them of an error for example.
- If
you would like an AidKey sent back to the host on receipt of this screen, select the
exception step's
 Path and enter the relevant key in
the AidKey property.
Path and enter the relevant key in
the AidKey property. - If you would like the transaction to continue execution after this screen is received, specify the screen that will be received next in the path's NextStep property.
- Select Add
Fields from the menu and select any input or output fields for the screen.
- Select
 Save.
Save. - Test the transaction to ensure that it is catering for the irregular screen correctly.
Example
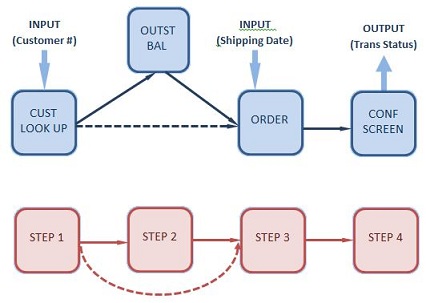
In this example we have created a transaction that edits the shipping date of an existing customer order. This transaction takes two inputs, customer ID and ShippingDate. The transaction returns a string, TransStatus, indicating a successful update.

If the customer has an outstanding balance, then a notification screen will be displayed prior to receiving the order screen. This alerts the end user that an outstanding balance exists.
Depending on what action the end user needs to take when this screen appears will dictate whether this screen is treated as an occasional screen or exception screen.
If the notification does not require any further action (i.e. it is typically dismissed by the user) then it could be included in the standard transaction sequence. During playback, if the screen appears then it would be handled by the transaction, if it doesn't appear then execution would skip to the next step as the screen does not take any custom input or return any outputs.
This approach would not be sufficient if the we want to alert the user of the outstanding balance (provide output from the screen) before continuing on with the transaction. Any step containing an input or output cannot be skipped therefore this screen would need to be defined as an exception step.
Once all steps in a transaction sequence have been exhausted and no appropriate match for the current screen has been found (either because the transaction sequence has completed or one of the steps fails to meet the conditions specified above) the recorder will jump to the list of exception steps and determine if there is a screen that applies to the current screen. If the exception step defines the current screen, then it will be executed and any input, output, logic or navigation defined applied to the current screen. Typically, this might be returning an error message to the user to alert them of an abnormal situation. Or, if the next screen that will be received from the host is known, an AidKey can be sent back to the host and the NextStep property specified to allow the transaction to continue.

It is worth noting that transaction recorder treats exception steps like any other step. If the exception step has no NextStep property defined then the transaction will terminate at this point. To enable the transaction to continue the NextStep property should refer to a step within the standard transaction sequence.
Without exception steps, any non-standard screen received from the host will generate the following error message, "An unexpected screen was encountered while executing the transaction" and the transaction will abort. If you are calling a transaction from a script then you could handle the error generated by an unexpected screen using standard script error handling however, where possible, it is preferable to create an exception step within the transaction as you may be able to prevent the transaction from terminating or provide more specific feedback to the user about the error.
Once you have recorded a transaction, it is important to test it, to ensure that it is functioning as expected and returning the appropriate values. Transactions can be easily tested by using the playback or step through tools in the transaction recorder.
- In the runtime client, connect to your host and navigate to the point at which your transaction commences (if your recording sequence includes a connection to the host, you can start playback before you connect).
- From the transaction
recorder menu, select Transaction
|
 Open and then select the transaction that you wish to playback and click
OK.
Open and then select the transaction that you wish to playback and click
OK. - From the transaction
recorder menu, select either Transaction | Play or Transaction | Play Step. Selecting Play will execute the transaction from start to finish. Selecting Play Step, allows you to execute your transaction, one step at a time. The latter option is useful if you are troubleshooting, and you want to find out where the transaction is failing.
- If there are inputs defined for the transaction an input form will appear on the screen. Enter the relevant data and click OK.
![]()
The transaction should then playback (either in its entirety or a step at a time, depending on which option you have selected) and issue the relevant inputs to the host where required. As each step of the transaction is successfully completed it will appear in the status window. If output fields have been specified within the transaction they will also appear at the bottom of the status window.
![]()
Additional Information:
- It is possible to commence playback of a transaction from any screen in the transaction sequence providing the previous steps do not contain any input or output fields. For instance if you are on a screen that is defined at Step 3 of the transaction you can initiate playback of the transaction from this screen. The Transaction recorder will pick up from the screen override where the transaction should commence. This feature is useful for users who may need to access a specific screen from numerous places in their application.
Use the following process to delete an existing transaction:
- From the runtime client main menu, select
Tools |Transaction Recorder ().
- Select Transaction | Open , and then select the transaction that you wish to delete.
- Click Delete and close the Open Transaction window. This action will also remove the transaction from the transactions collection.
![]()
The following table provides an explanation of the different transaction properties and how they work.
Transaction level properties:
|
Properties |
Description |
|
Name |
The name assigned to the transaction. When calling the PlayTransaction method, use this name to reference the transaction that you want to play. |
|
OnAbort |
(Optional) A macro or script that will run when the transaction aborts. This property can be used to return an appropriate message to the user if the transaction fails. |
|
OnFinish |
(Optional) A macro or script that will run when the transaction completes. This property can be used to inform the user of the transaction's status. |
|
OnStart |
(Optional) The macro or script that will run before the transaction commences. This property is useful if you need to set up input values for the transaction. |
|
StartForm |
The screen at which the transaction starts. This is the name of the form override for the screen assigned to the first step of the transaction. |
|
WebServiceName |
(Optional) If specified, this transaction can be exposed as a web service in Newlook Server with the name specified in this property. |
Step level properties:
|
Properties |
Description |
|
DefaultPath |
This property is a legacy property that was used for offline data entry. It is not supported from version 11 onwards. |
|
EnableUnusedFields |
This property is a legacy property that was used for offline data entry. It is not supported from version 11 onwards. |
|
ExceptionStep |
Specifies if this screen is to be treated as an exception step. Refer to the topic on catering for unexpected screens for further information on how to use this property. |
|
Form |
The screen that this step relates to. This is the name of the form override assigned to the screen. |
|
Instructions |
This property is a legacy property that was used for offline data entry. It is not supported from version 11 onwards. |
|
Name |
The name of the individual step - this name is derived from the form override defined in the step. It can be manually modified if you would prefer to specify a more meaningful name. |
|
OnReceive |
The macro or script that is run when the form defined in this step is received from the host. Note that this logic will only execute if the step is hit as part of the transaction. It is separate to any OnReceive logic assigned to any overrides matching this screen. |
|
OnSend |
The macro or script that is run when the form defined in this step is sent back to the host. Note that this logic will only execute if the step is hit as part of the transaction. It is separate to any OnSend logic assigned to any overrides matching this screen. |
|
ShowForm |
This property is a legacy property that was used for offline data entry. It is not supported from version 11 onwards. |
Path level properties:
|
Properties |
Description |
|
AidKey |
The Aid Key which is to be sent to the host with the screen. |
|
HostCursor |
This property is used to specify the cursor location before sending the final Aid Key to the host, where appropriate. The value of this property is the row, column co-ordinate of the cursor. |
|
Name
|
The name assigned to the Path. The default name is Path1 unless otherwise specified. It is recommended that custom names are assigned where a step contains multiple paths to clarify the purpose of each path. |
|
NextStep |
The step that will be executed next. |
Field level properties:
|
Properties |
Description |
|
Column |
The column and row properties specify the first character position of the field on the host screen presentation space to which the control corresponds. The Column property is always in the range 1 to 132. |
|
Length |
The length in bytes of the field on the host screen. |
|
MandatoryEnter |
This property is a legacy property that was used for offline data entry. It is not supported from version 11 onwards. Determines whether the input field that you have defined is a required field or not. If set to true, the transaction will not continue until a valid value for this field is provided. |
|
Name |
The name assigned to the field. Unless otherwise specified this name will be assigned based on the field prompt adjacent to the field (if there is one). This may not always be a logical name for the field and thus it is important to review and modify field names if necessary. |
|
Password |
Specifies whether the characters typed by a user should be displayed as placeholder characters when the transaction is played. The value for this field is derived from the host field's underlying attributes. |
|
Row |
The column and row properties specify the first character position of the field on the host screen presentation space to which the control corresponds. The Row property is always in the range 1 to 27. |
|
ShowInDialog |
This property is a legacy property that was used for offline data entry. It is not supported from version 11 onwards. |
|
Type |
Specifies whether the field is a field requiring input from the user (InputField), a field that has static input defined within the transaction (LiteralInput), a field that is defined as output to the transaction (OutputField) or is unknown. |
|
Value |
For LiteralInput fields, this property is the value that will be sent to the host for the field. |
Let's look at a real-world example in more detail:
Imagine that you have an end user who performs the same data entry task multiple times a day. This task involves navigating through four or five different screens (depending on where the user is in the application), inputting some known data and clicking the OK button. It is possible to create a transaction that performs this function automatically, from anywhere in the system at the press of a button, and provides feedback about whether the task was successful.
Using the basic application in the diagram below, when the user performs the data entry task manually, they must first navigate from wherever they are, back to the top menu, then proceed to the 'CUST A1' screen, via the 'CUST MENU' and 'CUST A' screens.
At 'CUST A1', the user is required to input some data, and send the ENTER key to the host.
This task can be automated in two ways:
- Create individual transactions to perform the entire process from any screen in the application
- Split the process into multiple transactions; one to perform the data entry task and one (or more) to handle navigation.
The latter process is more efficient, as it provides navigational transactions that can be used with other transactions.
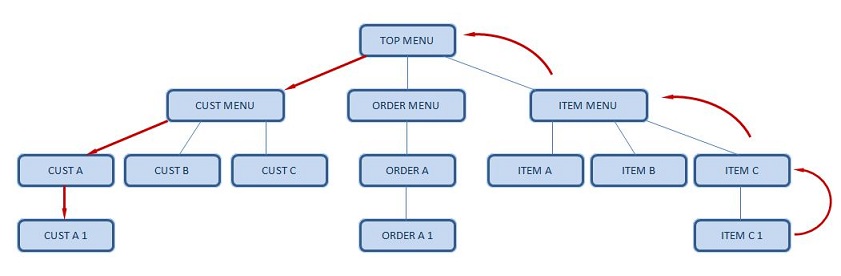
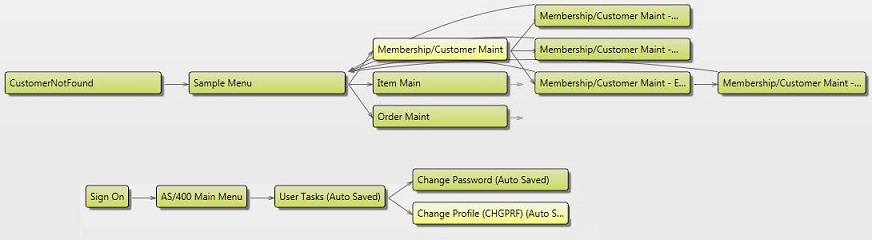
The aim is to create a transaction which will navigate from anywhere in the system to the CUSTA1 screen. This is done by recording all the steps necessary to navigate from 'TOP MENU' to every screen that the user might use (including the CUSTA1 screen) and back again. We are essentially providing the recorder with a virtual model of our application, creating pathways for navigating to and from any part of the system. Once saved, this navigational transaction can be used in conjunction with one or more processing transactions.
The following diagram shows all the navigation paths that would be recorded in the first transaction.
![]()
The second transaction created will be one that performs the data entry task. There is no need to include any navigation in this transaction as the first transaction already includes instructions to navigate to any screen in our navigation paths.
Let's pretend that the data entry task involves entering a customer number at the 'CUST A1' screen, progressing to the next screen 'CUST A2' and updating an address field for the given customer then issuing the Enter key.
![]()
Here are the steps you would take to record that task:
- Navigate to the 'CUST A1' screen and begin recording. Capture every keystroke until the customer's address is successfully updated.
- Stop the recording.
- Modify the transaction properties of the first step to change the 'customer #' field on the 'CUST A1' screen so that it's Type is InputField.
- Modify the transaction properties of the second step to change the 'customer address' field so that it's Type is InputField.
- Use the Add Field button to select a field on the screen which contains the value you want to output from the transaction. This may be a confirmation message on the screen.
- Save the transaction.
The transaction does not need to contain anything other than the task itself and any possible exceptions that might be returned.
After both these transactions are saved they can be tested by navigating to any of the screens in the navigational transaction, then opening the data entry transaction in the transaction recorder and hitting the play button.
The recorder will refer to the navigational model it has constructed to navigate to the first screen in our data entry transaction. It will then execute this transaction sequentially.
![]()
Each time you create a transaction, any navigation information provided in that transaction will be added to the internal application model. It is very important that every screen has a unique Screen ID assigned to it to ensure that the application model is accurate. Over time the application model will become more sophisticated as further navigational links are established.
The PlayTransaction method calls used in your solution might look something like this:
JSCRIPT
Supplying arguments to the PlayTransaction method using comma separated values:
var param1 = app.GetValue("CustomerID");
var param2 = app.GetValue("NewCustomerAddress");
var result = App.PlayTransaction ("EditCustomerAddress",param1,param2);
var returnArray = result.toArray();
Supplying arguments to the PlayTransaction method using comma separated key/val pairs:
var custID = App.GetValue("CustomerID");
var newAddress = App.GetValue("NewCustomerAddress");
var result = App.PlayTransaction("EditCustomerAddress", "CustomerNumber=" + custID, "CustomerAddress=" + newAddress);
var resultArray = result.toArray();
See Also
Using transaction recorder to define a web service | Transaction Object | Transactions Collection
© 2004-2021 looksoftware. All rights reserved.